Showing posts with label Project Corner. Show all posts

Thursday, April 16, 2015

Wendy Four Legged Friend Scarf Kits

Wendy Four Legged Friend Scarf Kits 


Wendy four legged friends knitting kits at www.thewoolshop.ie


This scarf kit comes in a lovely blend of colour ways with easy to follow instructions. The head, legs and tail are already made up, just ready to sew on when the scarf is completed. 


Wendy four legged friends knitting kits at www.thewoolshop.ie


The amazing thing about this kit is if you start to knit from the outside of the ball of wool you will get one effect, if you work from the inside of the ball the effect is different. 

Wendy four legged friends knitting kits at www.thewoolshop.ie


There are four different colour ways available. An ideal gift for child or adult and these kits, which come in presentation boxes, are suitable for all level of knitters.   

Wendy four legged friends knitting kits at www.thewoolshop.ie

Wendy four legged friends knitting kits at www.thewoolshop.ie


Wendy four legged friends knitting kits at www.thewoolshop.ie

This scarf kit contains: 

Knitted Head (stuffed)
Legs and Tail (stuffed)
1 x 100g ball of dk acrylic

5mm needles not included
Deminsions: 20cm x 10cm x 10cm


Wendy four legged friends knitting kits at www.thewoolshop.ie


Easy and simple to knit, these kits (€14.95) are available to purchase at


Saturday, March 21, 2015

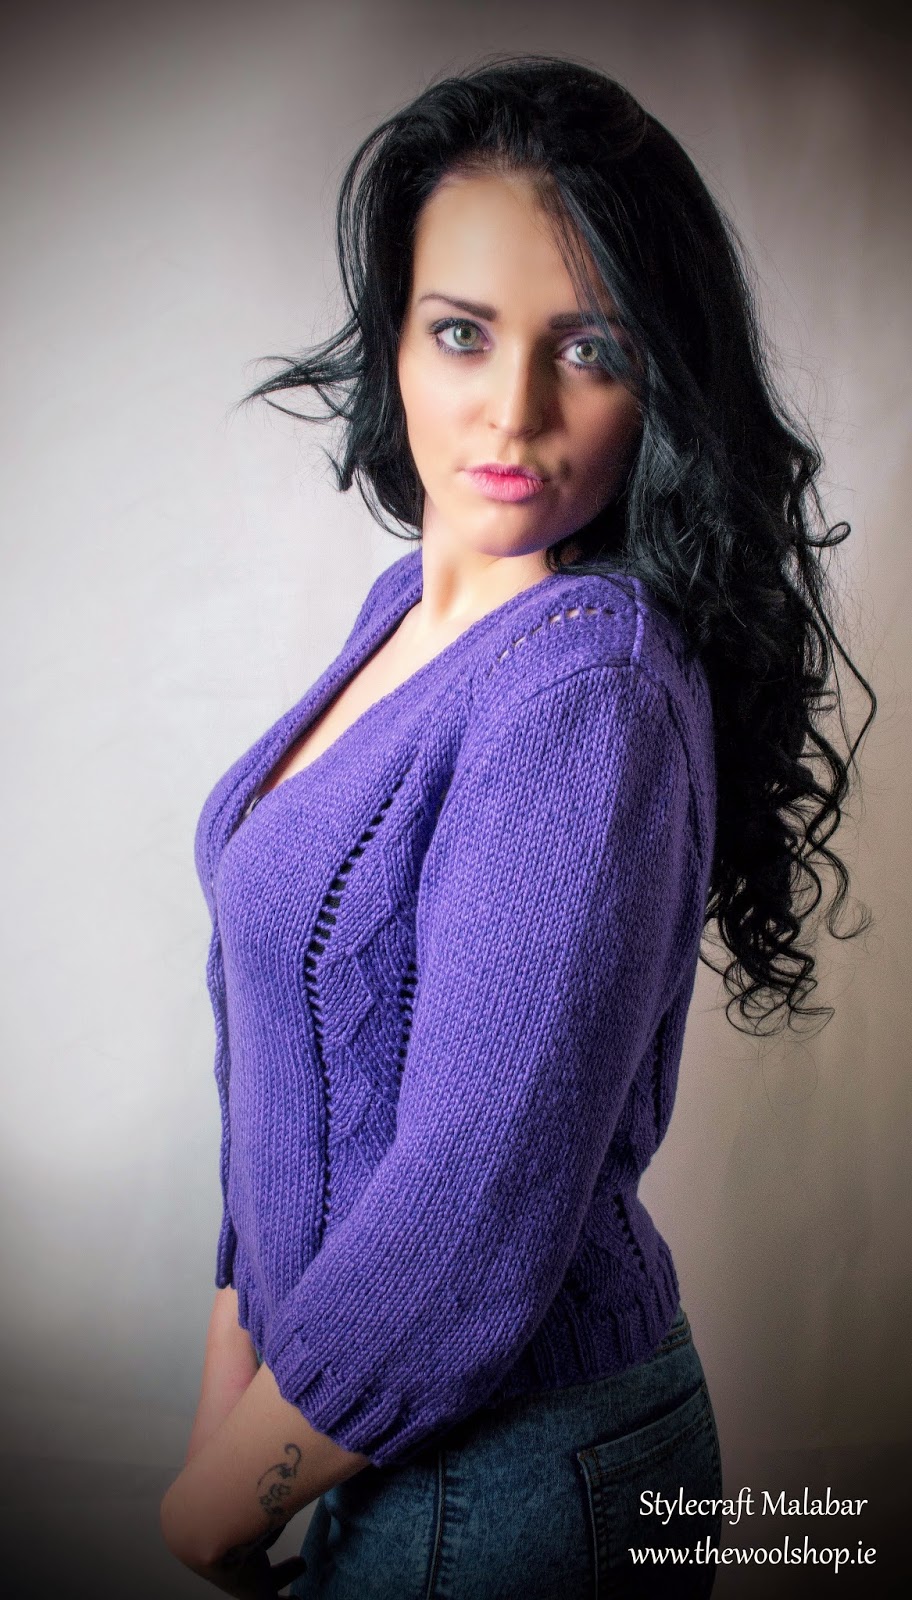
Stylecraft Malabar Aran - Easy lace knit pattern - thewoolshop.ie


Stylecraft Malabar Aran 

Cardigan Pattern 


Malabar Aran

'Malabar Aran which is a rich blend of silk and cotton in an Aran weight. The natural fibres give this yarn a wonderful drape and the rich colour palette of intense shades makes this the perfect yarn for summer knits and crochet accessories'.


Styecraft malabar aran, cardigan, knitted, handmade, pattern, cotton silk


At thewoolshop.ie we try to bring knitting to a whole new generation of people interested in creating their own clothing and styles, this pattern gives a perfect finish using Malabar Aran. It feels rich to hold, enough weight to feel like you have a quality cardigan. The fit is really good, also there is a little bit of a stretch to the yarn so its very comfortable to wear. The soft finish to the cotton and silk yarn gives a touch of coolness making this cardigan perfect for summer evenings.


Styecraft malabar aran, cardigan, knitted, handmade, pattern, cotton silk


We decided at thewoolshop.ie we would re-shoot the photographs and show you how trendy this cardigan can be. Not that there's anything wrong with the original photograph of the cardigan but just to show you the cardigan in a different setting. So rather than just looking at the pattern picture, we thought you are missing out on just how great this project can look in reality ''so to speak''


The knitting of this cardigan pattern was pretty easy to follow using 5 malabar aran 100g balls, the yarn is very nice to knit with on a 4.5mm (USA 7) 5mm (USA 8) set of needles for this particular project. The sizing guide is pretty good but keep in mind there is that little bit of stretch as we mentioned before.


You can find the pattern and sizing guide here:

 http://www.thewoolshop.ie/magento/stylecraft-malabar-aran-pattern-9140.html


Our after thought.......

Malabar Aran Headband 


Shortly after the Cardigan was knitted we decided to try something else with this great yarn. we wanted to give you an idea on how vibrant the shades are. We took an idea from a cowl pattern also Stylecraft Malabar Aran and modified it from a cowl to a head band and from crochet to knitted. 


The colours are very bright as you can see in the picture below


Styecraft malabar aran, cardigan, knitted, handmade, pattern, cotton silk


The yarn has great stitch definition. I am not as familiar with crochet as I am with knitting but this cowl really took my fancy. I decided I would try something similar with knitting and try to work in the stunning colours together as with the crocheted version...but as a head band. 


Styecraft malabar aran, cardigan, knitted, handmade, pattern, cotton silk


Here's the how to.......

Cast on 132 stitches

(colour a)    Knit 2 rows

(colour b)    Knit 5sts, Slip 1st, continue to end of row.

(colour b)    As above but Slip 1st purlwise.

(colour c)    Knit 2sts, Slip 1st, Knit 5sts, Slip 1st, continue to end 
                    of row Knit 3sts.

(colour c)    As above but Slip 1st purlwise.

I have used 8 colours and continued the pattern as above. 16 rows in total, 
casting off in the colour I started with.


''We hope you like what we have created with Stylecraft Malabar Aran''


www.thewoolshop.ie


Credits

Model: Charlotte Power

Tuesday, March 10, 2015

Knitted St Patrick (Tutorial) - Sue McLoughlin


Knitted St Patrick


St Patrick, knitting, st patty, knitted toys, ireland, DK Yarn


Materials

Pair of 3.25mm,3.5mm or 3.75mm knitting needles.

2 x double pointed needles (choose from the sizes above)

50gm green DK yarn.

Oddments in skintone, pink or beige, white DK.

Oddment grey eyelash yarn.

18“ narrow white ribbon, Black & gold embroidery thread

Jam jar lid, wooden skewer, cooking foil

Toy Stuffing


Knitting Pattern to make ‘St Patrick’Using DK yarn and worked on two needles


BODY 

Using 3.25mm/3.5mm or 3.75mm needles, cast on 40 sts in a skintone/pink yarn/beige coloured yarn

Work 8” in st st, 1 row knit, 1 row purl, ending after working a purl row.
Shaping – for the base


Row 1 (k8, k2tog) 4 times. 36 sts
Row 2 (p2tog, p7) 4times. 32 sts
Row 3 (k6, k2tog) 4 times. 28 sts
Row 4 (p2tog, p5) 4 times. 24 sts

Continue decreasing in this way until 8 sts remain. ext Row (k2tog) 4times. Cut yarn and draw through sts and fasten off. Sew up seam. Stuff firmly. TIP Put a jam jar lid in the bottom of the body before stuffing. This will help with stability. 


HEAD

Cast on 24 sts in pink, skintone or beige.
Row 1 Knit
Row 2 Purl
Row 3 Increase in first st, knit to last 2 sts. 
Increase in next st and k the last stitch.
Row 4 Purl
Repeat the last two rows twice more. 30sts.


Continue in st st until work measures 2.5”.Next Row (k2tog) 15 times. 15 sts.
Next Row P1 (p2tog) 7 times. 8 sts.


Cut yarn leaving a long tail. Pull yarn through stitches and fasten off.
Join the seam and stuff piece firmly.


Stitch the head on to the body, lining the seams up at the back.


UNDER SKIRT

Using white yarn, cast on 81 sts and work 4” in moss stitch, every rowk1, p1 to end.


Cast off all sts and join the side edges. Sew a running stitch all the way along the cast off edge. DO NOT FASTEN OFF OR CUT THREAD.
Slip the underskirt over the body of ‘St Patrick’ and pull the thread to gather loosely. Position the underskirt about half way up the body and stitch into place keeping the gathers even all the way around.


CLOAK

Using green yarn, cast on 21 sts and purl 1 row.
Next Row k1, m1 to last st. K1. 41sts (M1 = insert your right hand needle point through the loop that lays between the next 2sts and lift it. Now put your left hand needle into this loop and transfer it to your left hand needle, then knit into the back of it. Work in the opposite way (if you are left handed.)


Next row Purl
Repeat last two rows twice more. 161 sts. NOTE: Your stitches will be fairly tight at this point, however, they will ease off. Continue straight in st st, without increasing, until work measures 7”. Work 6 rows in moss/seed stitch. Cast off.
Sew up the seam and put piece to one side for later


ARMS – Make 2

Using your double pointed needles and a double strand of yarn, cast on 5sts in your skintone/pink/beige colour. 


You are going to make an I-Cord. Without turning your work, slide your stitches to the working end of your needle, the working yarn will be at the opposite end to normal. Put your free needle into the first st and pull your working yarn across the back of the stitches and over the top of the other needle, this pulls the edges together, DO NOT WRAP IT AROUND YOUR NEEDLE, now pull this through the stitch.
Knit the other 4 sts. Repeat this row for 4”.


Cast off. Stuff lightly and close up the ends.


Position the arms on the body and stitch into place.


Go back to the cloak and run a gathering stitch around the neck but do not pull closed just yet. Slip the cloak over ‘St Patricks’ head with the seam down the back, and pull the gathers to fit close to the neck and fasten off. No need to stitch into place, the gathers will hold it.


BEARD

Using an eyelash yarn, cast on 5sts.
Row 1 Purl
Row 2 Inc once in first st. Knit to last 2 sts, inc in next st, knit the last st. 7 sts
Row 3 Purl
Row 4 As row 2. 9 sts
Row 5 Purl
Row 6 As row 2. 11 sts
Row 7 Purl


Cast off. You may have to trim the ‘beard’ depending on the length of the fibers of the yarn.
Stitch the beard into place with the WRONG side facing out, this is the hairiest side..


HAIR

Cast on 26 sts and work 1.5” in st st. Castg off. Stitch the hair into place, with the wrong side of your work facing out, using the picture as a guide. As with the beard, you may need to give him a haircut.


HAT – Make 2 pieces

Using your green yarn, cast on 20 sts. Work 2 rows in st st.
Next row Inc in 1st st, knit to last 2 sts. Increase in next st and knit the last one. 22 sts.
Next Row Purl
Next Row Inc in each of first 2 sts. Knit to last 3 sts. Inc in each of next 2 sts and knit the last one.
26 sts.


Next Row Purl
Row 1 K2tog twice, k to last 4 sts, k2tog twice. 22 sts
Row 2 P2tog, p to last 2 sts, p2tog. 20 sts
Row 3 K2tog twice, k to last 4 sts, k2tog twice. 16 sts
Row 4 as row 2. 14 sts
Row 5 as row 3. 10 sts

Row 6 as row 4. 8 sts
Row 7 K2tog, k to last 2 sts, k2tog. 6 sts
Row 8 Purl
Row 9 as row 7. 4 sts
Row 10 Purl
Row 11 K2tog twice
Row 12 P2tog. Fasten off.


With right sides facing, seam around the two sides of the hat, leaving the bottom open. Turn the hat the right way out and stuff making sure to keep the point at the top of the hat.
Pin the hat on to the head at the back, this is just for stability, making sure to cover the stitching line for the hair. Stitch the hat down making sure that the hair stitching is covered and the stuffing stays inside the hat.


Finishing Off

Using a gold/yellow embroidery thread, embroider a border all around the edges of the hat. Embroider a ‘cross’ on the front of the hat in gold/yellow thread.


Embroider eyes nose and a mouth on to the face, hope yours is better than mine.


Stitch ribbon down at the back of the neck and embroider gold ‘buttons’ along the whole length.


Wrap the skewer in foil fairly thickly and slide it off again. This makes a narrow tube. Bend this tube into shape to make the top of the sceptre. Make a foil ‘ball’ and slide it on to the top of the skewer about 3” down from the top. Attach the top of the sceptre with a bit of tape.


Bend the arms into the position that you want them and secure with a couple of stitches. Pull the cloak into it’s final position and sew the edges together below the arms for about 1”. Now attach the sceptre to the other hand with a few stitches. Attach the sceptre with a few stitches at the bottom on the skintone body. St Patrick is now complete. 

Enjoy.

Please visit Sue here on her facebook page: 
https://www.facebook.com/babystitchesbysue?ref=hl


Take a look at her website baby stitches here:
www.babystitches.net 


Saturday, February 21, 2015

Animal Felting - thewoolshopPR


Since starting my new position at thewoolshop.ie I have seen crafts that I never heard of before let alone attempt to try, but because I work there I suppose its only fair I try something 'the chef must taste his own food' so to speak. Anyway I was interested in felting as its something I never heard of until I asked my sister who is always doing something crafty. First I was warned the needles are so deadly you would more or less have blood stained wool, rather than have something to be proud of, then I was told how much time it takes to do it, I was never one not to try out something new so I said lets give it a go.

I started by asking questions at thewoolshop.ie like the basics of needle felt, again I was told you will be stabbed repeatedly starting out with the needles, as if twice wasn't enough to be told I kept going on to try it out. I have heard of people making crazy realistic things like dogs and cats from felt that look completely real, obviously lets not get too over ambitious, so I started with a kit from thewoolshop.ie, this one to be exact........


In this pack you will find one needle, a piece of foam to give you the initial shape, some wool, and some decorations. At first I thought this is going to be easy, I had all I needed or had I? In the kit they only supply enough for one side of the animal in my case a sheep, and one eye! One sad eye!

Lucky for me thewoolshop.ie had some left over felting wool in lots of colours so that wasn't a big deal, I could complete both sides easily, as for the decorations and the eyes I raided a craft box at my sisters house. Got all I need now, lets try it out. You get one needle so remember this, they snap so easily if you punch the wool at the wrong angle,.. lesson learned! Keep the needle in a straight smooth motion and you will have no problems.... or so I thought! The first punch with the needle went straight into my thumb. It's like been tested for blood sugars over and over. I have a new respect for diabetics now (lol.) After multiple wounds I got the hang of it, slow and steady is key. I took to it easily enough and I soon started to like it as I started covering more ground. The kit is great for beginners like me but its super basic. Don't expect anything amazing out of the kit but as a general starting point its pretty good I think.
Animal felting


On completion of the felting it was time to customize the sheep, I decided to give it to my Sister as a present so I made it very much for a girl, I gave it a new coloured ribbon and some gems which I hot glued on. Presto! All done...not bad at all, great gift for anybody, especially after putting blood, sweat and tears into it, literally.
Animal felting

 
The final word on this is, definitely try it, if you hate it then no problem but you never know, you may find something you really enjoy.
Animal felting

Wool and supplies for felting can be found here